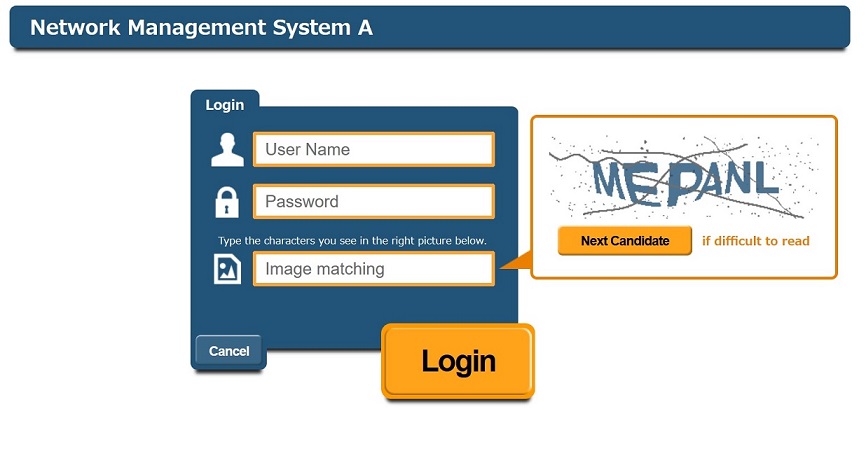
In web-browser access SYSTEM A (https://www.rcnp.osaka-u.ac.jp/netmanage1/)
Use your RCNP computer account's username and password to login.
On the right side of the page there is an image with characters in it.
Write the characters in the indicated field. (If you can't read the characters press "Next Candidate")
Click "Login".
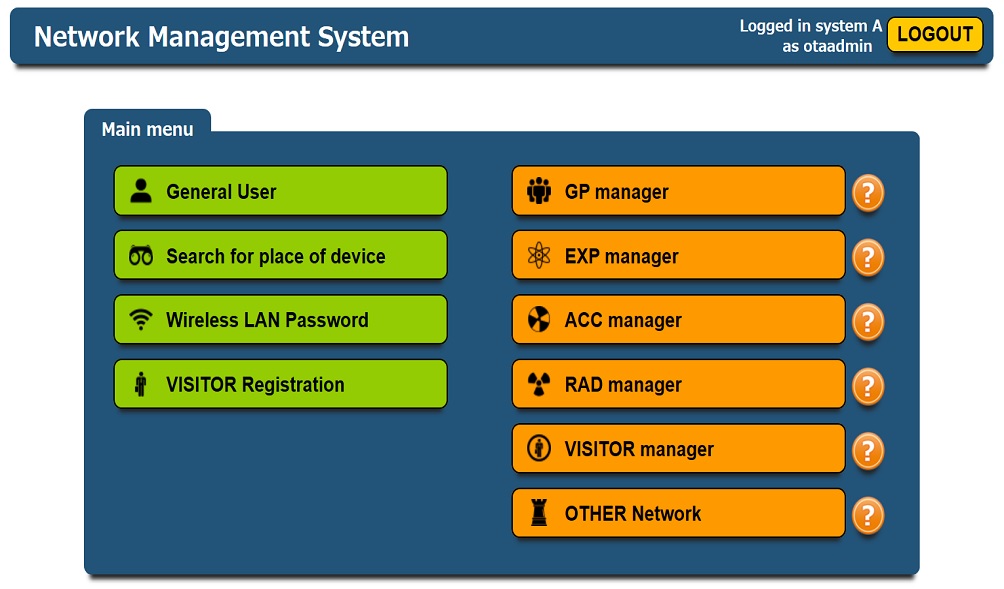
After logging in you will see the following page.
The buttons you don't have permission to use will be grayed out.
- General User
Normal users can manage their devices connected to RCNP's network. - Search for place of device
Locate devices connected to RCNP's network. - VISITOR Registration
Register devices for short time visitors and guests. - GP manager
For managing the general network. - EXP manager
For managing the experiment network. - ACC manager
For managing the accelerator network. - RAD manager
For managing the radiation control network. - VISITOR manager
For managing short time visitors. - OTHER Network
For managing devices connected to segments other than GP,ACC,EXP and RAD.
Only "General User" will be explained in detail, because the usage of
- GP manager
- ACC manager
- EXP manager
- RAD manager
- OTHER Network
Registration, modification, deletion etc. of devices can be done here.
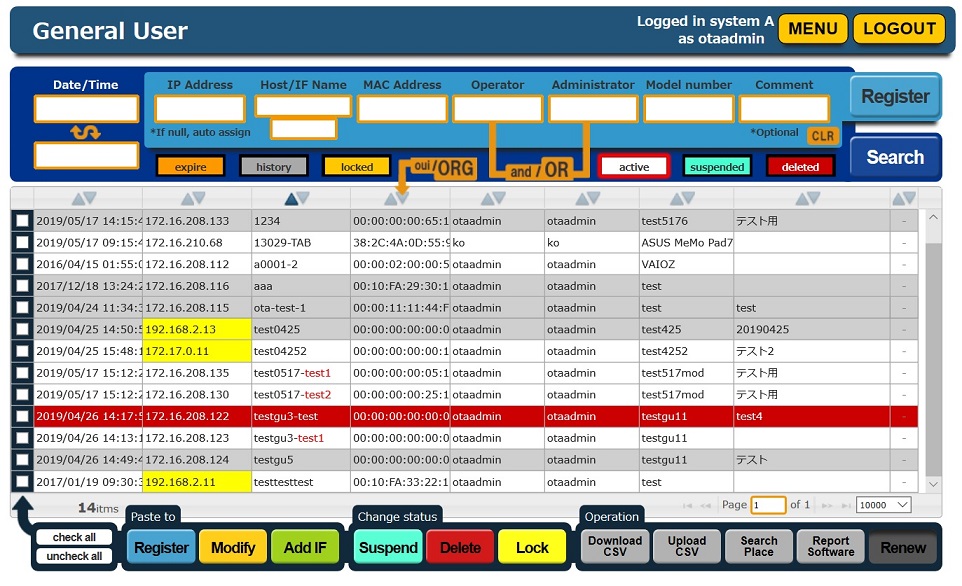
In the part of the page colored with . You can enter device details.

- IP address will be assigned automatically.
If you want to use specific IP address please type it in "IP Address field.
- Input hostname (device name).
- Input MAC address
※How to find MAC address can be seen here. - Input Operator (user of the device).
- Input Administrator (Supervisor of the user).
- Input Model number (Name/model of the device).
- Input comment.
※Additional not mandatory.
If successful you will get "The registration has been completed." message.
The device you added will be shown in a list (blinking).
After waiting a moment click "Search".
After the device registration has been processed the blinking will stop.
After the device registration has been processed both the operator and administrator will receive mail notification.
If processing the device takes more than 5 minutes, (it blinks even after clicking the "search") please contact consult@rcnp.osaka-u.ac.jp.
Enter the information you want to look for in the fields inside colored part of the page.

Date/Time use the calendar that opens when you click the date field. Don't try to guess the format by inputting the date manually.
All of the inputs fields use exact match by default.
Wildcard * can be used.
※ will match any characters.
※ can be used multiple times.
When matching operator and administrator AND or OR condition can be used. OR is the default.
- To change between the two click "and/OR" button. The active option will be shown in capital letters.
Active filter will be surrounded with red glow.
- expire
- history
- locked
- active
- suspended
- deleted
|
|
Show device registration expire date instead of last modification date. Show all current and past devices. Only show locked devices. |
|
|
Show active devices. Show suspended devices. Show deleted devices. |
- 「active」・「suspended」・「deleted」 can be toggled on and off independently.
By clicking 「△▽」 above the list will get the list sorted based on the column you click it from.
On first click in ascending and on second click descending order.
Sorting with multiple columns is supported. When shorting with multiple columns the one clicked later will take preference.
By default the devices are sorted by hostname in ascending order.
If you press 「oui/ORG」 the first half of mac address will be shown as vendor name.
If you become the operator of device connected to other network, the IP address will be shown in yellow."
There are 3 different locks.
 User has locked the device. User can unlock it on their own.
 Administrator/manager has locked the device. Only administrator/manager can unlock.
 Device has been locked based on firewall settings. Device can be unlocked by changing firewall settings.
Find the devices you want to modify.
Check the checkbox of the device you want to modify.
※You can only modify one device at a time.
By clicking "Modify" button inside the "Paste to" toolbar, all the registration information will be copied to corresponding fields above.
Modify the device information inside colored part of the page.

- IP address, interface name, MAC address and comment are all interface specific.
- hostname, operator, administrator and model number are linked/shared between device's all interfaces.
The device information that is being modified will be shown. (blinking)
After waiting a moment click "Search".
After the modification has been completed the blinking will stop.
After the information has been updated both the operator and administrator will receive mail notification.
If modification of the device takes more than 5 minutes, (even after click the search button) please contact consult@rcnp.osaka-u.ac.jp.
If the device has more than one network interface, you need to register all the ones you wish to use.
Find the device you want to add the new interface to.
Check the checkbox next to it.
- If you already have added more than one interface, you can choose any of the old ones.
※You can only choose one.
Add the additional interface's information in colored part of the page.

- IP address will be assigned automatically.
If you want to use specific IP address please type it in "IP Address field.
- Input interface name.
- Input MAC address.
※How to find MAC address can be seen here. - Input comment.
※Additional not mandatory.
The interface and its information you added will be shown in a list (blinking).
After waiting a moment click "Search".
After the interface has been added the blinking will stop.
After the interface has been added both the operator and administrator will receive mail notification.
If adding the device takes more than 5 minutes, (even if you click the search button) please contact consult@rcnp.osaka-u.ac.jp.
Find the devices you want to remove.
Check the checkbox of the device you want to remove.
-
※ You can remove multiple devices at one.
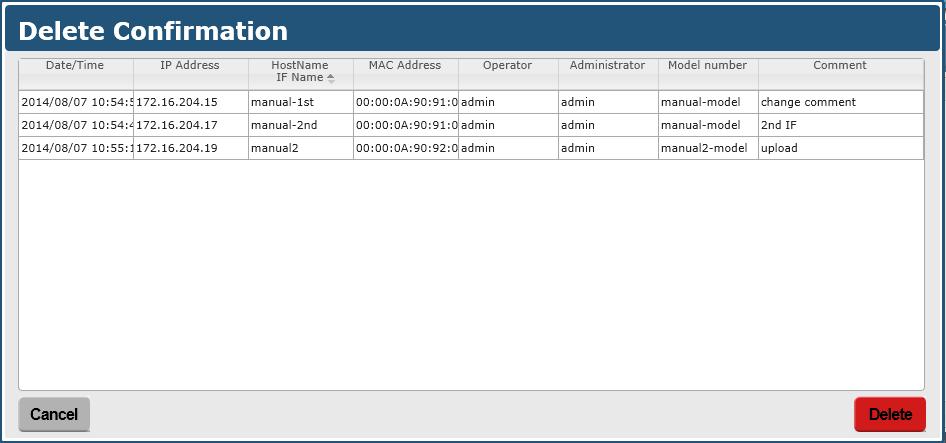
When you return back to "General User" page the information you deleted will be gone.
If you want to look for previously removed devices, click the "deleted" button.
The deleted device you deleted will be shown in a list (blinking).
After the device has been removed the blinking will stop.
After the device has been removed both the operator and administrator will receive mail notification.
If removing the device takes more than 5 minutes, (event if you click the search button) please contact consult@rcnp.osaka-u.ac.jp.
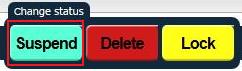
Suspending a device will not delete it, but make it function the same way if it wasn't registered (not working).
- Suspending
Find the devices you want to suspend.
Check the checkbox of the device you want to suspend.
Click 「Suspend」 from 「Change status」 toolbar.
- Resuming
Find the devices you want to resume.
Check the checkbox of the device you want to resume.
Click 「Suspend」 from 「Change status」 toolbar.
After waiting a moment click "Search".
After the status change has been made the blinking will stop.
After the status change has been made both the operator and administrator will receive mail notification.
If changing status of the device takes more than 5 minutes, (event if you click the search button) please contact consult@rcnp.osaka-u.ac.jp.
Suspending and resuming different devices at once is not possible.
To prevent accidental modification and removal of a device it can be locked.
Different lock types are "user lock", "administrator lock" and "firewall lock".
- Locking
Find the devices you want to lock.
Check the checkbox of the device you want to lock.
Click 「Lock」 from 「Change status」 toolbar.
The locked device will have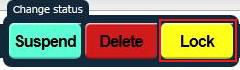 next to it.
- Unlocking
You can only unlock devices you have locked yourself.
Find the devices you want to unlock.
Check the checkbox of the device you want to unlock.
Click 「Lock」 from 「Change status」 toolbar.
Downloading the information of the device you have registered is possible in CSV format.
Find the devices which information you want to download.
Check the checkbox of the devices you want download.
Click 「Download CSV」 from the 「Operation」 toolbar.
You will prompted to download the file.

Registering devices, modifying devices and adding additional interface is also possible via uploading a correctly formatted CSV file.
CSV format.
Check one checkbox of any device and click 「Download CSV」.
Use the downloaded CSV file as template.
Remove the all the information from the second row.
- expiration_date (D column)
The latest accepted date is next academic year's 30th of April.
※ optional, can be left empty
- host_name (E column)
Input hostname (device name).
- ip_address (G column)
IP address will be assigned automatically.
If you want to use specific IP address please type it here.
- mac_address (H column)
Input MAC address
※ How to find MAC address can be seen here. - operator (I column)
Input Operator (user of the device).
- administrator (J column)
Input Administrator (Supervisor of the user).
- model_number (K column)
Input Model number (Name/model of the device).
- comment (P column)
Input comment
※ optional, can be left empty
Even if you fill them the columns will be ignored.
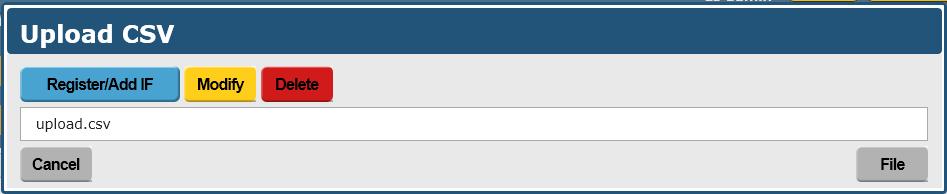
Click 「Upload CSV」 from the 「Operation」 toolbar.
You will be promoted to choose a file to upload. Choose the prepared file.
If the registration completes normally you will get message in the top of the page.
The message will disappear in several seconds.
Find the devices you want to modify.
Check the checkboxes of the devices you want to modify and click 「Download CSV」.
※ Modifying multiple devices at a time is possible.
Open the downloaded CSV file and modify the information.
- 「host_id」 and 「if_id」 determine the target device, so don't change them.
- IP address, interface name, MAC address and comment are all interface specific.
- hostname, operator, administrator and model number are linked/shared between device's all interfaces.
You will be promoted to choose a file to upload. Choose the prepared file.
Click 「Modify」.
Find the devices you want to add the new interfaces to.
Check the checkboxes of the devices you want to add the interfaces.
If you already have added more than one interface, you can choose any of them.
※ Adding multiple interfaces to multiple devices at once is possible.
Open the downloaded CSV file and modify it to include the new interfaces.
Don't modify following columns (A、B、C、E、I、J、K、L、M、N、O).
- expiration_date (D column)
The latest accepted date is next academic year's 30th of April.
※ optional, can be left empty
- if_name (F column)
Input the interface name.
- ip_address (G column)
IP address will be assigned automatically.
If you want to use specific IP address please type it here.
- mac_address (H column)
Input MAC address
※ How to find MAC address can be seen here. - comment (P column)
Input comment
※ optional, can be left empty
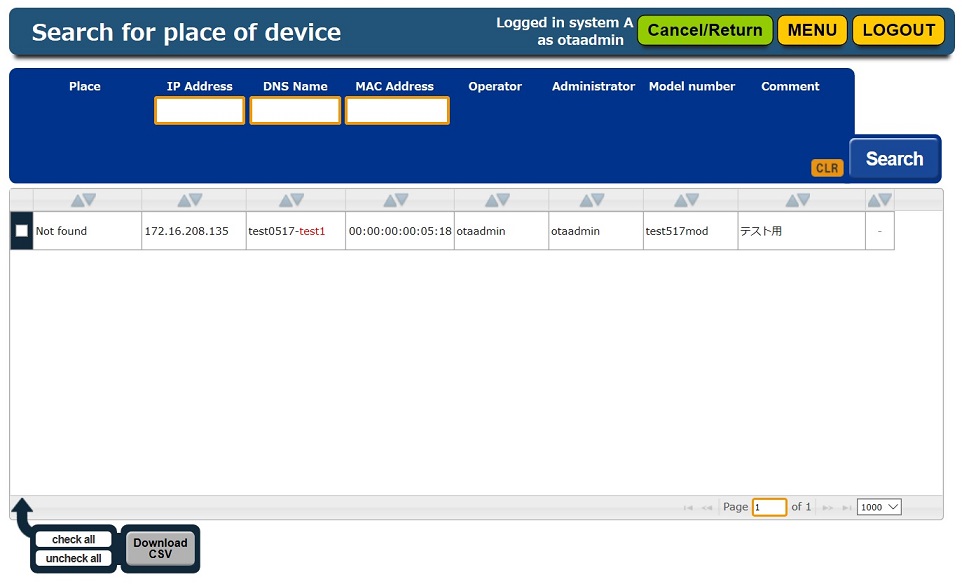
Locate devices connected to the RCNP's network.
Find the devices you want to locate using "General User".
Check the checkboxes of the devices you want to locate.
※ You can locate multiple devices at once.
Click 「Search Place」 button inside the 「Operation」 toolbar.
After several seconds the results will be shown.
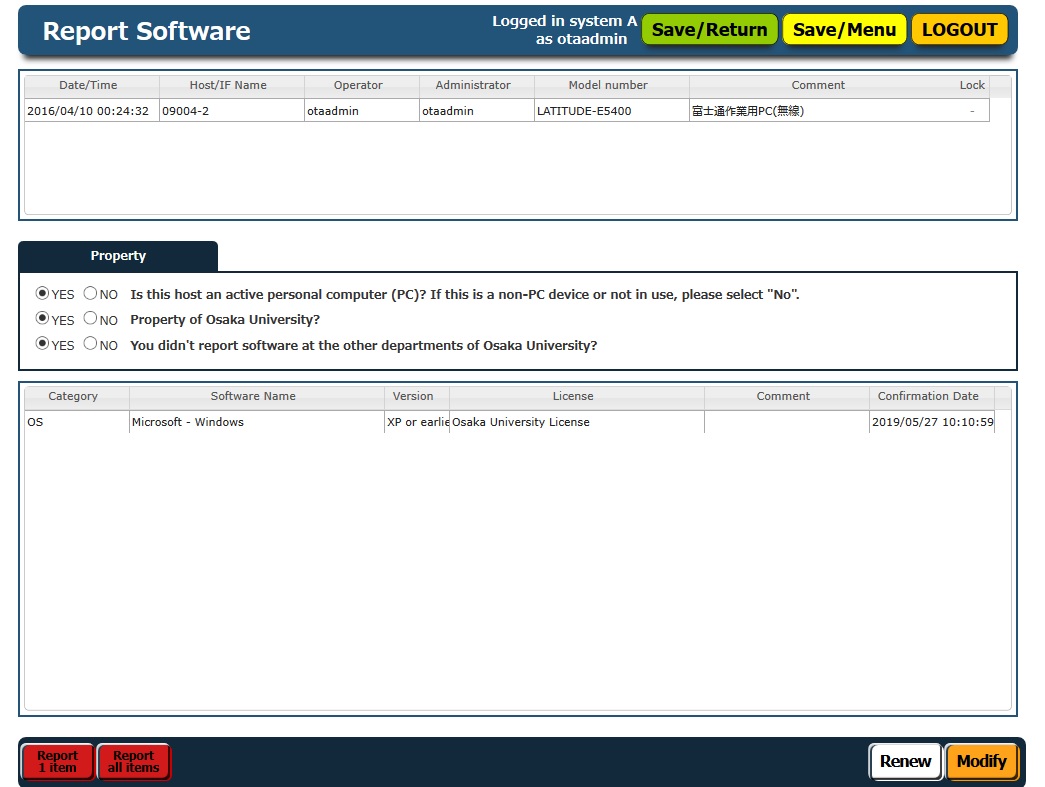
Can report softwares installed on the devices.
Check the checkbox of the device you want to report softwares and then click 「Report Software」 from the 「Operation」 toolbar.
※You cannot select more than one device at once.
Please see here for details.